Tone
Use themeColor(listener, tone, color?) from @domphy/theme to resolve colors from theme context.
Tone Span
Tone Span is the contrast-span model derived in the Chromametry paper for sequential monochromatic ramps.
- For a color family with
Nordered lightness steps,Kis the minimum index distance that guarantees WCAG4.5:1contrast for all valid pairs in that family. - This turns contrast selection into a fixed index rule instead of repeated runtime checking.
- In the current Domphy light ramp,
N = 18, so the working span isK = 9.
Formal definition:
K = min { k : CR(c_i, c_{i+k}) >= 4.5 for all valid i }
For the formal definition, benchmark method, and cross-system results, see:
- Repo: https://github.com/chromametry/chromametry
- Paper: https://github.com/chromametry/chromametry/blob/main/paper/paper.pdf
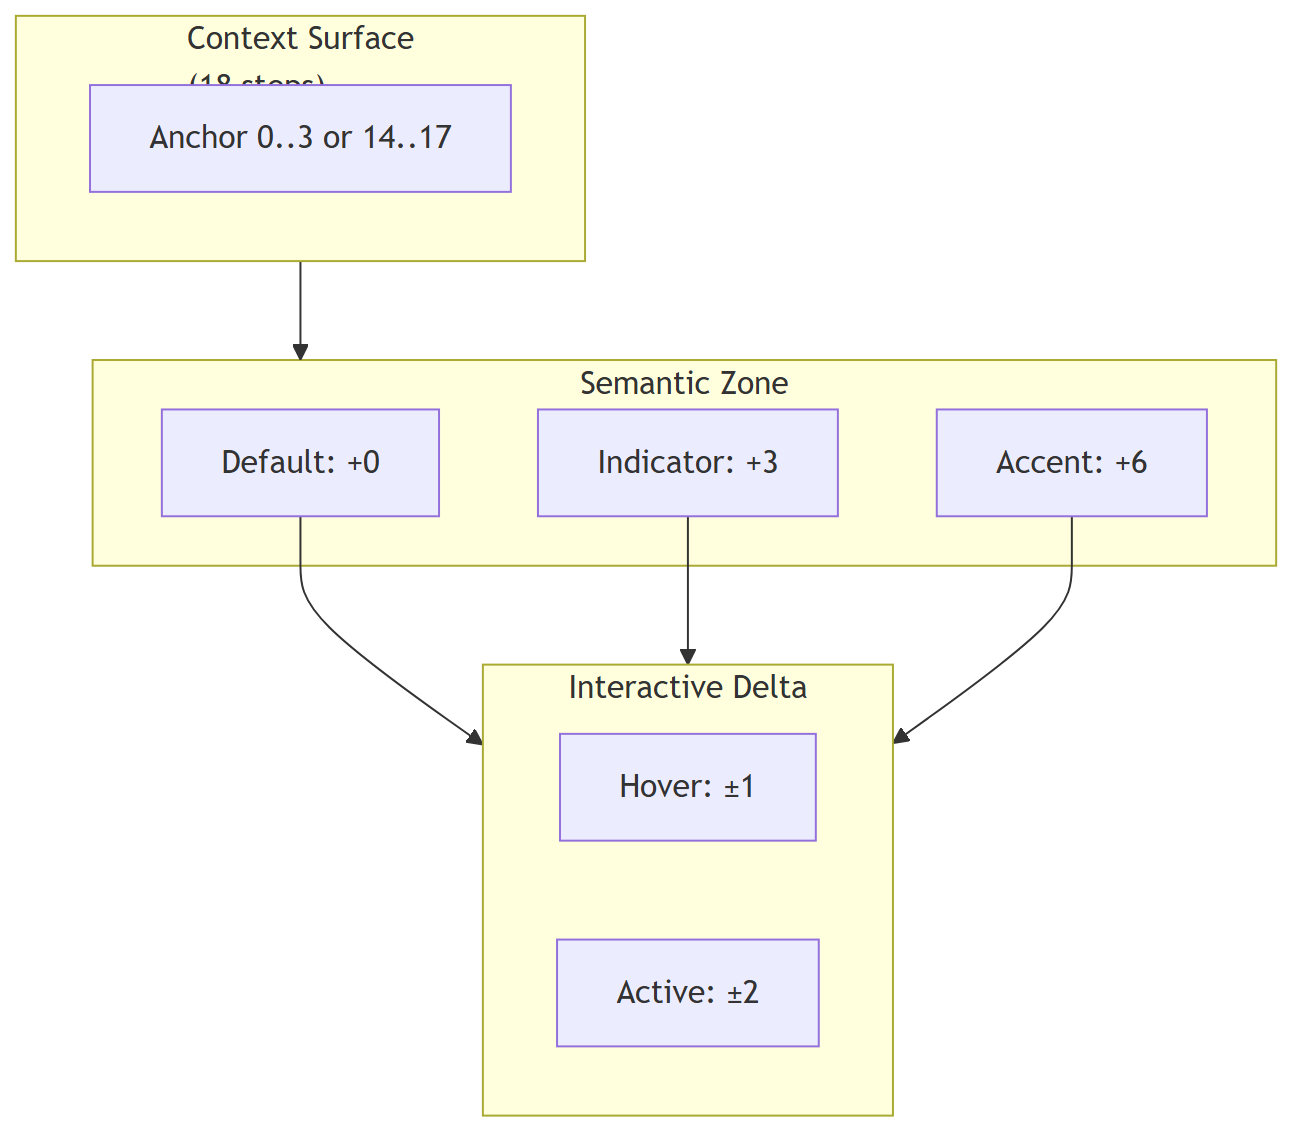
Tone System Hierarchy
Domphy's tone system is built on three independent logical layers. This is the abstract model, before any concrete step count or ramp mapping is applied.
1. Layer 1: Context Surface
This is The Floor. It is not the state of the object itself, but the environment that contains it.
- Role: Defines the local tone field for a subtree.
- Meaning: Establishes the anchor from which child elements are measured.
- Behavior: Gives the system a stable surface reference so descendant tones can be interpreted relative to the same anchor.
2. Layer 2: Semantic Zone
This is The Seat. It describes the object's stable semantic position before any interaction happens.
- Role: Encodes meaning, not interaction.
- Meaning: Distinguishes resting, positional, and emphasized states.
- Behavior: Creates persistent semantic separation between elements that share the same context surface.
3. Layer 3: Interactive Delta
This is The Action. It is a temporary modifier applied on top of the semantic zone during interaction.
- Role: Expresses live response such as hover or press.
- Meaning: It is transient and should never redefine the semantic identity of the element.
- Behavior: Adds a small offset so interaction remains visible without collapsing into another semantic zone.
General Formula
At the abstract level, the final tone is always resolved from the same three-layer composition:
T = C_surface + S_zone + I_delta
Where:
Tmeans the final toneC_surfacemeans the context surface anchorS_zonemeans the semantic zone offsetI_deltameans the interactive offset
This formula is the core rule of the hierarchy: context defines the anchor, semantics define the stable zone, and interaction adds a temporary local delta.
Tone Mapping
This section applies the abstract hierarchy to the current Domphy tone ramp.
For the current Domphy light ramp:
N = 18
K = 9
K = 9 is the contrast span reserved by the system between background and text. In practice, this means the first 9 steps can be used for surfaces and state layers, while the contrast target for text begins at step 9 relative to the same anchor.
1. Surface Anchors
To keep tone progression predictable, the context surface should usually start near one edge of the 18-step ramp.
Normal surface anchors:
0,1,2,3Inverted surface anchors:
17,16,15,14The purpose of choosing edge anchors is to keep tone progression moving in one direction inside a single context.
If a surface starts in the middle of the ramp, child tones can hit a clamp before the progression finishes, then appear to bend back toward the opposite side. That produces unstable and visually ugly mapping.
No matter whether the local context is interpreted as increasing or decreasing, the final resolved surface band should still land in one of these two edge ranges.
0, 1, 2, 3keep the surface on the low edge so child tones can expand upward in a single clear sequence.17, 16, 15, 14keep the surface on the high edge so child tones can still be mapped consistently in the inverted case.
AI should prefer these surface anchors and avoid arbitrary middle anchors unless there is a specific reason.
2. Semantic Mapping
To keep the system structured, Domphy maps the semantic layer into three equal regions inside the available K = 9 surface span:
- Default zone:
0 - Indicator zone:
K / 3 = 3 - Accent zone:
2K / 3 = 6
This is why K = 9 is a strong fit. It divides cleanly into three semantic anchors:
0for rest3for indicator6for accent
These anchors are far enough apart to be perceptually distinct while still remaining below the text threshold at 9.
3. Interaction Mapping
Interactive deltas stay intentionally small:
- Hover:
+1or-1 - Active:
+2or-2
That gives each semantic anchor its own local interaction range without collisions:
0->1->23->4->56->7->8
Because the three semantic anchors are spaced by 3, and the largest interaction delta is 2, every resulting tone remains unique.
The proof below applies the general formula from the hierarchy section on top of those surface anchors.
Proof matrix (example with Context Surface = 0 and K = 9):
| Actual state | Logical formula | Result (Final Tone) |
|---|---|---|
| Resting component | 0 + 0 + 0 | Step 0 |
| Hovered component | 0 + 0 + 1 | Step 1 |
| Pressed component | 0 + 0 + 2 | Step 2 |
| Static indicator (Menu) | 0 + K/3 + 0 | Step 3 |
| Indicator + Hover | 0 + 3 + 1 | Step 4 |
| Indicator + Press | 0 + 3 + 2 | Step 5 |
| Strong state (Toggle) | 0 + 2K/3 + 0 | Step 6 |
| Strong state + Hover | 0 + 6 + 1 | Step 7 |
| Strong state + Press | 0 + 6 + 2 | Step 8 |
Proof matrix (example with inverted Context Surface = 17 and K = 9):
| Actual state | Logical formula | Result (Final Tone) |
|---|---|---|
| Resting component | 17 + 0 + 0 | Step 17 |
| Hovered component | 17 - 0 - 1 | Step 16 |
| Pressed component | 17 - 0 - 2 | Step 15 |
| Static indicator (Menu) | 17 - K/3 - 0 | Step 14 |
| Indicator + Hover | 17 - 3 - 1 | Step 13 |
| Indicator + Press | 17 - 3 - 2 | Step 12 |
| Strong state (Toggle) | 17 - 2K/3 - 0 | Step 11 |
| Strong state + Hover | 17 - 6 - 1 | Step 10 |
| Strong state + Press | 17 - 6 - 2 | Step 9 |
Invariant rule: The total variation (Semantic Zone + Interactive Delta) must stay below K. With K = 9, the sequence 0, 1, 2, 3, 4, 5, 6, 7, 8 forms three clean semantic bands, and Step 9 remains the start of the text-contrast region. That is why 9 works well: it divides into three stable zones and still leaves hover and active states unique without overlap.
Tone Roles
When Domphy says tone without another qualifier, it usually means the resolved surface or background tone of the element itself.
From that base tone, the common visual roles are derived as follows:
- Background / Surface: the tone itself
- Text: the tone plus or minus
K - Stroke: the tone plus or minus
K / 3
Here, stroke means the structural edge role, such as outline, border, or a separator line.
With the current Domphy light ramp:
K = 9
K / 3 = 3
So the concrete role mapping is:
- normal side:
background = tone,stroke = tone + 3,text = tone + 9 - inverted side:
background = tone,stroke = tone - 3,text = tone - 9
This is the practical reason tone selection stays anchored near the edges: the derived roles remain ordered, predictable, and do not collapse back into the wrong side of the ramp.
Shift System
Valid tone keys:
"shift-N"whereNis0to17"increase-N""decrease-N""inherit""base"
dataTone accepts the same keys.
Use them like this:
inherit= keep the current local surfaceshift-N= go to a fixed semantic slot on the current branchincrease-N= move further along the current branchdecrease-N= move back along the current branchbase= jump to the registered base tone of that color family
Basic example:
backgroundColor: (l) => themeColor(l, "shift-0", "primary")
color: (l) => themeColor(l, "shift-9", "primary")
outline: (l) => `1px solid ${themeColor(l, "shift-3", "primary")}`
Full Example
const button = {
  button: "Buy",
  style: {
    fontSize: (l) => themeSize(l, "inherit"),
    paddingBlock: (l) => themeSpacing(themeDensity(l) * 1),
    paddingInline: (l) => themeSpacing(themeDensity(l) * 3),
    borderRadius: (l) => themeSpacing(themeDensity(l) * 1),
    backgroundColor: (l) => themeColor(l, "inherit", "primary"),
    color: (l) => themeColor(l, "shift-9", "primary"),
    outline: (l) => `1px solid ${themeColor(l, "shift-3", "primary")}`,
    "&:hover": {
      backgroundColor: (l) => themeColor(l, "increase-1", "primary"),
    },
    "&:focus-visible": {
      boxShadow: (l) => `0 0 0 2px ${themeColor(l, "shift-6", "primary")}`,
    },
  },
}
Context Tone
dataTone propagates down the tree. Descendants resolve their own tone automatically.
{ div: [...], dataTone: "shift-1" }
{ span: "Error", style: { color: (l) => themeColor(l, "shift-9", "error") } }
Recommendation
Prefer dataTone over changing container colors manually.
// better
{
  div: [Button, Text],
  dataTone: "shift-1",
  style: {
    backgroundColor: (l) => themeColor(l, "inherit", "danger"),
  },
}
Use dataTheme only when you truly want a different theme, not just a darker or lighter local surface.